Troubleshooting Wrinkling and Lifting in Refinishing
Key Highlights
- Incompatible coatings, solvent-sensitive primers, insufficient flash time, and excessive film build can cause lifting or wrinkling.
- Follow current manufacturer instructions for compatibility, film build, flash and dry times, reducer selection, and bake cycles.
- Over questionable primers or fresh repairs, apply basecoat in light, controlled coats.
- For minor defects, sand smooth and refinish; if the coating continues to react, remove unstable material to a sound substrate.
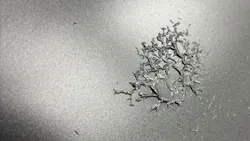
Wrinkling and lifting are among the most frustrating problems a refinish technician can encounter in the spray booth. They can turn an otherwise routine repair into a time-consuming rework, often requiring sanding, resealing, or in severe cases, starting over completely. Understanding why these defects happen is the best way to prevent them.
Lifting and wrinkling can occur when a fresh coating reacts with the material underneath it. The new layer can soften the existing film, causing it to swell, move, ripple, or separate. The result is a distorted paint film that may appear wrinkled, raised, cracked, or unstable.
The most common causes are incompatible materials, insufficient flash time, excessive film build, or a combination of these factors. One common example is refinishing an OEM or aftermarket bumper that arrives coated with a 1K primer. While that primer may provide basic adhesion, it can be sensitive to solvent attack. Problems often occur when a technician applies a 2K sealer over the 1K primer but does not allow the recommended flash time or does not apply the sealer at the proper film build.
Most sealers are designed to create a specific barrier, often applied at around 1 mil dry film thickness, depending on the manufacturer’s technical data sheet. If the sealer is applied too thin, it may not effectively isolate the 1K primer from the solvents in the basecoat. If the basecoat is applied too heavily, the solvents can penetrate through the sealer, soften the primer, and cause lifting or wrinkling.
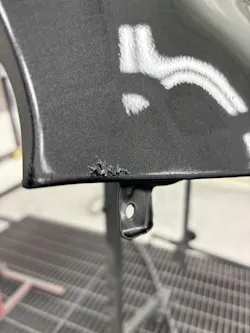
The recommended approach, although more time-consuming, is to remove questionable 1K primer from the bumper and treat the part as raw plastic, as recommended by the bumper and coating manufacturers’ current technical instructions. If the primer remains, apply the correct sealer film build, follow the recommended flash time, and avoid heavy basecoat application. Lighter coats can help allow solvents to evaporate more effectively before they can attack the layers underneath.
Another frequent cause is applying coats before the previous layer has dried properly. When wet layers are stacked too quickly, the top surface may skin over while trapped solvent remains underneath. As that solvent continues to move, it can cause the film to wrinkle or distort.
Re-repairs can also be risky. If a panel has recently been painted and the clearcoat is not fully cured, fresh solvents can attack the under-cured finish. The coating may look dry on the surface but still be “green” underneath. When refinishing over a fresh repair, follow the applicable coating, substrate, and equipment manufacturers’ current technical instructions, including any specified bake cycle, allow the panel to cool, and avoid sanding through during prep. Use the correct temperature reducer, apply lighter coats, and allow each coat to dry fully before continuing.
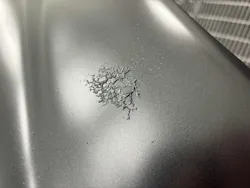
If wrinkling does occur, the repair method depends on severity. For minor wrinkling, sand the defect smooth and finish with the proper grit for the basecoat system being used. Then apply light, controlled coats until coverage is restored. If sanding breaks through the sealer or exposes a sensitive layer, additional repair steps will be needed.
In some cases, the area can be corrected by sanding the defect, resealing the repair area, allowing proper flash time, and reapplying basecoat with lighter coats. However, if the area continues to react, the best option is often to remove the affected material completely. Sand down to a stable substrate, apply a 2K surfacer, and bake according to the product recommendations. When sanding the surface, be careful not to break through. If you expose the unstable layer again, the reaction may return and the repair process will need to be repeated.
The risk of lifting and wrinkling can be reduced by following all applicable coating, substrate, and equipment manufacturers’ current technical instructions. Pay close attention to film build, flash time, dry time, reducer selection, and substrate sensitivity. Avoid overapplying basecoat, especially over questionable primers, fresh repairs, or sensitive substrates. Difficult colors may benefit from a slower reducer, but that also makes proper flash time even more important.
In professional refinishing, prevention is always faster than rework. Controlled application, proper drying, and respect for product compatibility are the keys to avoiding lifting and wrinkling in the booth.
About the Author
 Michael Nelson
Refinish Trainer
Michael Nelson is a refinish trainer at the 3M Skills Development Center. Michael has served the collision industry for 29 years. He previously held production painter and product specialist roles for Finishmaster and Axalta Coating Systems. He trains painters and preppers from across the country on all aspects of the collision repair process.