ADAS Calibrations: Out-of-the-box thinking

"An ounce of prevention is worth a pound of cure," or so goes the old saying, and this often applies to disassembly and reassembly procedures.
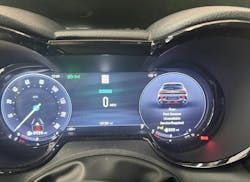
I was called to a shop for a complaint on a 2024 Alpha Romeo Tonale with a parking sensor system malfunction. Parking sensors now play a major role in ADAS. Some have advanced by being replaced by short-range modules, while others work directly with short-range modules to aid in cross-traffic technology. Some may require a calibration process or a simple initialization for the location they are installed in. This particular vehicle was just a plug-and-play operation, but there were underlining issues preventing the park assist system from operating. The body shop had already replaced a parking sensor in the affected area that was physically damaged from the hit along with a compromised bumper harness that had to be replaced, but the system still showed a message on the dash for “Parking Sensors Unavailable” (Figure 2). This particular vehicle had a secured gateway, so the shop was unable to perform bidirectional procedures such as clearing trouble codes. It is not unusual for this particular vehicle to run in a failsafe mode until all codes have been cleared in memory, but the shop’s scan tool was not set up to perform the gateway unlock procedure.
The gateway unlocking procedure would require the use of a factory scan tool with a valid subscription to access the manufacturer-specific server that would initiate the unlocking procedure. This procedure can also be performed with an aftermarket scan tool that has wireless capabilities, but you would need to register your tool with a website such as AutoAuth by setting up a yearly subscription account with them. The initial procedure would be to set up a username and password with the website. Then you need to enter shop information along with the names of all the technicians in the shop that will be using the shop scan tool. Once this is done, you will have to enter the brand of your scan tool along with the serial number of your tool. There are currently manufacturers such as Chrysler, Mercedes, Nissan, VW/Audi, and many more to follow. There are individual charges for access to each manufacturer. Some manufacturers such as VW/Audi will require a two-step verification process where an email will be sent with an authorization code to unlock the vehicle. Then your scan tool will show a countdown of how long the secured network will be unlocked. There are many shops that are not on board with this program or who are just unaware of this service and are unable to perform simple bidirectional tasks. This could lead to lost revenue or basically an unwanted towing charge to a local dealership. The shop opted to call me in to clear the entire network of error codes and reevaluate the vehicle to get to the bottom of this issue.
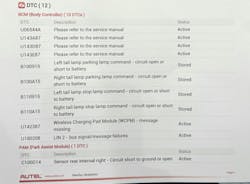
I proceeded to hook up my scan tool to unlock the secured gateway and received a parking assist module active code C100D14 “Sensor rear internal right circuit short to ground or open” (Figure 3). The body control module had four “U” Codes that were labeled “Please refer to the service manual” because the aftermarket scan tool I was using did not have an installed updated code library to identify these codes. When I searched for these codes in my information system and even tried Googling them, I came up empty-handed. The next code to address was a code U180208 “LIN 2 bus signal/message failure.” This code dealt with an issue with the hands-free liftgate module missing. The last code stored in the body control module was a code U142387 “Wireless charging pad module message missing.” I was going to deal with the “U” codes Iater because my main concern at this point was to deal with the right rear inner parking sensor that was putting the parking aid system into a failsafe mode.
This particular vehicle had the ability to pinpoint exactly which parking sensor had an issue, but there are many manufacturers that don’t specify which sensor is at fault. This depends on the design of the system and how they are wired because some parking sensor signal lines may be each wired independently, or they may be daisy-chained like lights on a Christmas tree. In these situations, you would have to purchase a parking sensor tester like the BartecQST250, which has the ability to check the sensors within the bumper by measuring the frequency output of each individual sensor. This can be done sitting in the driver's seat with the car put into reverse or drive with the use of the long-coiled test lead attached to the sensor tester that easily mounts on the bumper.
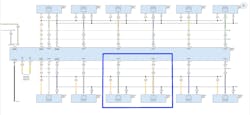
I instructed the body shop to pull the rear bumper so that I could do an integrity check on the harness and sensors within the bumper. I unplugged the right inner sensor connector to make sure the sensor pins were not damaged from improper insertion of the connector. It is not uncommon to find a bent or folded-over pin, so back-probing a connector to do circuit checks is not always a good practice to validate a wire harness. But all looked okay. I also swapped the two inner sensors to see if the problem would move to the left side. This was a quick, easy tactic that could save a lot of time and rule out a defective new part. But to no avail, the problem remained at the same location. My next move was to get a wiring diagram to rule out the new harness having any irregularities in voltage specifications (Figure 4). The right inner passenger side sensor was designated as Sensor #9, and pin #1 pink/yellow was the reference voltage Supply, Pin#2 white/dark green was the signal line, and pin#3 gray/blue was the sensor ground.
When I went to check pin #1, there was low voltage, about 2-3 volts. Pin #2 had 12 volts, and pin #3 did show a good ground. These circuit checks did not follow the expected outcome. When I pulled back the tape to get a closer look, I could see that the wire colors were off from what the diagram was showing. Then I got into that
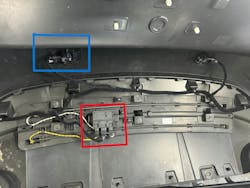
“out of the box” thinking mode. This was not the right connector, and the apple could not fall far from the tree. A closer inspection of the harness revealed that the connectors for both the hands-free liftgate module and the right inner parking sensor were identical and could be easily swapped. The passenger right inner sensor, outlined in blue — and the hands-free module, outlined in red — had feed harnesses that could reach either way (Figure 5). This was why there was a code for the hands-free module. Once I swapped the connectors back to their proper positions, both the parking sensor system and hands-free liftgate were operational, and I was able to clear ALL the codes in memory, including the undocumented codes.
I simply can’t understand how any manufacturer can make a harness that has identical connectors within the same vicinity that can be connected to different components. I recently had a body shop that put a rear bumper harness in and installed the harness 180 degrees out of orientation because each end of the harness had identical main harness connectors to plug into either harness end, located at the right and left rear quarter panels of the vehicle. It’s probably good practice to take pictures of a component — such as a bumper — prior to removing a harness to make sure you can perform a flawless installation. This would prevent a lot of POST issues of inoperative systems and lights on the instrument cluster. Information systems can only supply you with normal troubleshooting procedures, but they can never apply to conditions caused by an installer who creates a situation that goes against the grain. You need to be very alert when diagnosing a problem with a vehicle and remember to always think out of the box. I hope this story hits home with a lot of you body shop technicians and installers out there.
About the Author

John Anello
Owner and operator of Auto Tech on Wheels
John Anello is the owner and operator of Auto Tech on Wheels, established in 1991 in northern New Jersey. He provides technical assistance and remote reprogramming with 21 factory PC-based scan tools. Driven by a passion for cars, John's business now services roughly 1,700 shops.