Set up for success: ADAS calibration is a lot more than 'just pushing a button or two’
Key Highlights
- Proper vehicle alignment is crucial for accurate ADAS calibration; camber, caster, and toe values must be within specifications before proceeding.
- Regular equipment maintenance, including updates and rack inspections, ensures alignment machine accuracy and reliable results.
- Clean windshield and camera lenses are vital; obstructions can cause false positives and calibration failures.
- Perform pre- and post-scans to verify system codes and calibration success, ensuring safety and compliance.
- Understanding the differences between static and dynamic calibration helps technicians choose the right method for each vehicle and situation.

Editor's note: This article was updated Feb. 9, 2026.
You can’t just steer away from it. A proximity sensor, here…that one – over there - has Radar (Figure 1). Vehicle advanced driver assist systems (ADAS) are here to stay, so you might as well embrace the new tech and move forward with your continuing automotive education. It does not matter if you are composing a static or dynamic ADAS calibration (part replacement-marriage) or recalibration (resetting the modules); there are some important steps a tech needs to perform before going forward and pressing the tablet button.
Who would have ever imagined how important an alignment would be?! If you do not have camber, caster, and toe values within specs before ADAS calibration/recalibration, you might as well go home. By not following the rules and performing this all-important check first, an out-of-alignment vehicle could steer your customer into big-time trouble. Subsequently, so could you, as you shell out monies in attorney fees and court costs.
The specifications for proper module operation are slim — one degree or less slim. I know that does not sound like much, but an uncorrected vehicle traveling (speed not a factor) in 60 feet will deviate from its intended path by one foot. Let's say an average single-family home lot is approximately 90 feet long. A vehicle traveling down the road — in front of the house — would end up 18 inches off its initial centerline. Whether it’s in a ditch or into on-coming traffic, either scenario is not a good outcome.
Yes. Verifying alignment is that important.
Verify equipment is in proper operating order every day
We are jumping the gun here. Before you even think about checking steering and suspension values, the equipment must be in operating order. The first on the list? Make sure the aligner has the latest calibration updates. I can’t tell you how many times I have come across a false-positive diagnosis or set-up due to the shop not updating its computer-controlled devices. This, I recommend, should be an everyday job, just like making coffee for the customers. In fact, that would be a good time to get into the groove to ensure these updates are completed before the bay doors are open. Every day.
Now we go to the rack. The alignment combo needs a quick inspection.
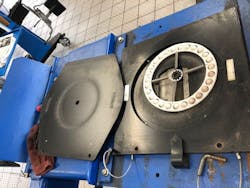
Whether it is a scissor or a four-post, we do not pay too much attention to the alignment rack; it sits there and does its job. It’s sometimes used for other jobs when a vehicle requires a heavy-duty rack, or when the other bays are filled with work, and someone needs a place to put a vehicle in the air. But, unlike any other stand, this device needs inspections and feeding to make sure the alignment end results are accurate (Figure 2).
The rack needs to be level: X, Y, and Z angles. The rear slide plates need to be clean and greased. The most neglected part of the alignment rack are the turntables. These critical alignment components have rules (Figure 3):
- Plates – front and back – should move easily, with a light touch of your index finger
- Replace turntables with spacers if you are performing jobs other than alignments on the rack
- Keep turntables clean and lubed
- Do not park front wheels on turntables unless you are going to perform an alignment
- Do not drive over turntables if pins are missing from plates
- Replace plastic bearings and garters when worn

And these rules are not just for pre-inspection or ADAS alignments. Turntables with worn bearings can affect any alignment; this usually shows up visually as an off-centered steering wheel. While others will blame software or the loose nut behind the wrench, the culprit usually comes back to the plates. Treat them with the respect they deserve.
Now, the alignment
There is no room for any steering gear movement other than its designed flow. And check for any chassis data regarding the electric rack and pinion. If a code pops-up, it will need to be addressed before going forward. As for the suspension, the ball joints, struts, and bearing plates need to be in spec. And let’s not forget the ride height. It’s an all-too-important item that is usually ignored because a tech is taking a shortcut, or he or she were simply not taught how to perform this reading. But we cannot do that anymore. In fact, there is a popular group that is dedicating a bay or two for the study and development of ride-height and ADAS.
The Specialty Equipment Manufacturers Association (SEMA) – that same group that congregates in Las Vegas every November for its annual convention – has recently purchased a testing facility in Plymouth, Michigan. Similar to its California facility, the 45,000 square-foot building will host an ADAS research lab, vehicle-lift kit studies versus ADAS, space for aftermarket tools development and Environmental Protection Agency (EPA) testing (including the new CARB 1066) available to manufacturers and Tier 1 and 2 suppliers, all in the spirit of bringing developed items to market.
Another key ingredient to a proper alignment? Addressing camber-caster settings on vehicles that have limited or no adjustments due to a previous accident. If shifting the subframe/cradle is not an option, it’s off to the frame shop for correction. Remember, alignments need to be spot-on for proper ADAS calibrations. And don’t forget to reset the steering angle sensor, where applicable, as some vehicles will either:
-
Self-adjust via factory coding.
-
Tech-aided adjust according to manufacturer specific steps.
-
Scanner-assisted SAS recalibration.
It is about time we start addressing this driver-aid system. Before we even highlight the ADAS tab, make sure you perform a pre-scan, proving there are no outstanding or pending codes that would affect a calibration/recalibration. And, when you have completed the ADAS reset, perform a post-scan to prove that your driver-aid reset was successful.
There are two types of calibration: Dynamic and static.
The dynamic calibration/recalibration is much quicker and less expensive than the static-framed cousin. Dynamic is a year/make/model (YMM), step-by-step instruction. Some companies are very specific to the road conditions and obstacles. For example: overpass/tunnels and specific speed ranges are rules noted by original equipment (OE) groups. In some cases, dynamic resets may be a two-tech operation, with one technician reading instructions from a tablet while the other technician drives the vehicle, per the OEM directions.
Then, there is the static calibration/recalibration. The tools needed here are the ones you see online and in magazines with the five-digit price tags. If you have one of these units in house – and have previously serviced ADAS -- you still need to double-check, look around the bay and make sure you will have a one-and-done calibration.
- Do you have the proper amount of space to complete the calibration/recalibration?
- Has anyone moved other equipment (i.e., RRR machine, roll carts, etc.) into the bay – for storage – that may interfere with the ADAS event?
- Depending upon the time of year – and solar positioning – is the bay receiving excessive lighting from an open door or fixed window?
- Have any posters/signage or wall storage been added that may interfere with calibration/recalibration?
Now, let us look at the actual ADAS stand and targets. Make sure there is no damage to the stand from storage. Unfortunately, sometimes techs like to hang extension cords or other items off the arms of the unit. If targets are not properly protected by a case or other means to shield the face, even a slight scratch can interfere with the calibration/recalibration process.
And a word or two about those internet-approved, print-it-out-on-your-copier targets. Do not waste the paper. It’s too litigious out there not to do it right from the start. If a vehicle gets into an accident and the plaintiff attorney digs deep enough to find your printed-paper calibration/recalibration months – or years – earlier, your savings of not purchasing an OEM target may be eaten up by court costs, attorney fees and customer restitution.
Don’t forget other, simple prerequisites
Another, common calibration/recalibration issue: the battery maintainer. Do you think you have enough juice in that vehicle battery? Think again! I witnessed a trainer who was performing an ADAS recalibration without hooking-up the battery maintainer. (Yes, one was available.) But he was short on time and trying to rush through a RADAR reset…and the RADAR would not reset. Why? The battery charge values for the ADAS recalibration were below specs. Adding the maintainer to the equation did the trick. Recalibration complete.
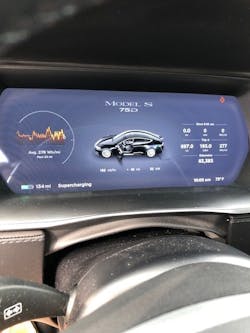
One more step that needs to be addressed: cleaning camera/windshield lenses. Something as simple as obscured vision due to dirty lenses will trigger a false-positive. And if you are driving a Tesla, a dirty camera lens will prevent the vehicle from going into autonomous mode. Yes, it’s that important that these ADAS modules have an unobstructed view.
During the static setup, most machines rely upon the technician to perform target triangulation. Sometimes, this can be a little tricky with string and tape, especially in a windy shop. Well, they say, “There is an app for everything,” and this includes triangulation, also known as Pythagorean’s Theorem. Available in both Apple OS or Android, just plug in the numbers and get to your target standpoint flawlessly and quickly.
The rest? Just follow the steps and push buttons on your dedicated tablet. It’s that simple.

Finally, the time has come to verify your repair and test-drive. Make sure there are no ADAS-related icons on the instrument panel (Figure 4). Operate all ADAS functions on the vehicle. For example: Test the lane departure warning (LDW) system by safely crossing into the next lane. Check and make sure that audible and/or haptics are operational. Do this for all vehicle-ADAS functions. Did everything pass? Print out the post-scan and printout for the consumer (Figure 5).
The change is here, now. There is no turning back unless you refuse to work on anything that has ADAS. And no one is going to turn away a customer. Before you purchase a tablet for dynamic or static equipment, do your homework. Read – and watch qualified videos – regarding the calibration/recalibration process. Most of all: ask questions. There is never a stupid question, especially when it comes to everyone’s safety on our roadways.
About the Author

Pam Oakes
Automotive SME Pam Oakes has been embedded within the automotive industry for 30 years as an automotive applications engineer, instructor/course developer (for several international companies), 609 instructor/test proctor, automotive business expert/strategist, 20-year original start-up shop owner/multiple auto business owner, ASE master automotive and medium/HD truck and collision technician-trainer with L4 ADAS, diesel Class 8 instructor, ASE testing contributing panel member (L4/A7), automotive author, syndicated radio host, and automotive-consumer news media commentator. And she still “turns-wrenches” for fun.