Shining a light on plastic repair
If you’re an old guy like me, you can remember those simple times when replacing a headlight meant you went to the auto parts store and picked one up off the shelf. Your choices were limited — 5-1/4” or 7” diameter, high beam, low beam, or both. I still
remember how cool it was when the rectangular lights came out on the 1976 Oldsmobile Cutlass — it was like we’d been transported to the age of the Jetsons!
Little did we know at the time that this was to be our first glimpse at a dystopian future where headlights could only be bought at the dealership and would regularly cost more than $1,000. Why the change? The cynical among us might pin it solely on corporate greed, but it mainly started as a way to improve aerodynamics and safety. The first American car with “Euro” headlights was the wind-cheating 1984 Ford Taurus. After that, the changes came rapidly — halogen, xenon, LEDs, and now, even lasers, not to mention moveable elements, circuit boards, and ADAS sensors. Thanks to the ever-present drive to achieve five-star safety ratings, the OEMs have now created the brightest, safest, and most expensive headlights ever.
Thanks to their position in the front of the vehicle, headlights are often damaged in collisions. If the headlight takes a direct hit that damages the lens and optics, it’s time to call the dealership. However, it’s often the case that the lens and optics survived and only the mounting tabs are broken due to movement of the headlight’s support structure in the collision. Considering the cost of replacement headlights and today’s parts availability problems, repairing the headlight can often create a better outcome for the shop, vehicle owner, and bill payer.
OK, let’s say you have a vehicle in the shop right now with a headlight with a couple of broken tabs, but the replacement part is on backorder for a couple of weeks. You’re able to negotiate an arrangement with the bill payer and vehicle owner where you end up making more profit than you would have by replacing the headlight, which also saves the bill payer money and gets the vehicle back to its owner faster. A win-win-win arrangement for all parties. Now, how do we do the actual repair from a technical standpoint?
First of all, let’s assume you have a nitrogen plastic welder, because with the small surface area you have to work with on a headlight tab, a fusion weld of the plastic will give you more strength than a two-part adhesive would. Fusion welding does require that you identify the plastic and select a matching welding rod. Fortunately, most headlights have the ISO identification symbol molded right into the plastic. The confusing thing is often selecting which ID symbol is correct, because on headlights they mold the ID symbols for the lens, inner trim, and reflectors into the housing itself. Look for “HSG” or “Housing” molded next to the symbol. Headlights are almost always polypropylene with a talc filler, identified as “PP+TD20”. The talc filler makes the plastic brittle, which is good because it makes the tabs snap off cleanly without stretching, which means the broken tab usually fits right back in position perfectly.
Identify the plastic to select the proper welding rod
Most headlight housings are made from PP, but occasionally you will find them made of polycarbonate (PC), PET, or ASA. It’s important to properly identify the plastic before selecting the welding rod because a PP rod won’t stick to PC.
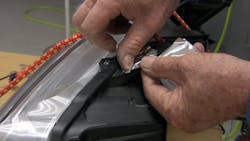
Once the plastic is identified and the matching welding rod selected, the next step is to fixture the broken tab and get it ready to weld. The shape of the tab itself will determine how the tab can be fixtured; if the geometry is simple and flat, a stiff aluminum tape can be used to hold the broken part in position (Fig. 1). If the tab is an odd shape or has gussets or ribs (which they often do), a couple of hot staples can be used to tack the tab in position. The main goal is to secure the broken part in the proper position while you do your weld repair.
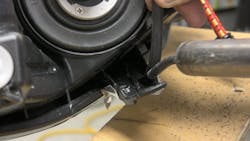
The next step is to v-groove the crack and prepare it for the welding rod. Because there are so many different shapes and sizes of headlight tabs, there is no hard and fast rule about how to weld the tabs. Normally you would weld the backside of the tab first. Assuming this, to prepare for welding along the crack first, use a pointed die grinder bit to v-groove right down the middle of the crack about halfway through the plastic (Fig. 2).
Headlight tabs are often very thin, so the v-groove may be shallow. Cosmetic appearance is only important if the top of the tab can be seen when the hood is open; if you are welding on the back of the tab first, you will have more freedom to go thicker or wider with the weld to increase the strength of the repair. Also use aluminum tape, if possible, on the frontside to further support the tab and to keep the welding rod from pushing through the thin plastic.
Another thing to consider is increasing the strength of the repair by welding reinforcements across the crack, like a “cross stitch.” Welding rod oriented this way will put the rod in tension and will transfer load across the crack, into the base material. Your ability to reinforce the weld in this way will depend on the geometry of the tab and whether you can increase the thickness on the backside. Observe how the headlight mounts and, in areas where there is clearance, you can increase the thickness for more strength.
Set up the welder for proper temperature and flow
The next step would be to set up your welder for the proper temperature and flow. The optimum welding temperature varies depending on the type of plastic, so follow your welder manufacturer’s recommendation. When it comes to plastic welding, hotter is not necessarily better. All of the materials used for headlight housings would require a medium temperature range (about 600-700F at the nozzle). Since most headlight tabs are very thin, if your welder offers flow control, turn it down slightly from your regular settings to keep from overheating and distorting the base material.
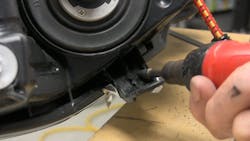
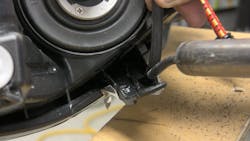
When welding, the most important thing is to make sure you melt both the base material and the welding rod at the same time while applying a slight downward pressure on the rod to fuse the two materials together as you make your pass (Fig. 3). When welding thin plastics like headlight tabs, be careful not to overheat the base material. The tab may start to sag or distort if it gets too hot. If you have to do multiple welds on the same tab, take a short break between welds to let the plastic cool down and regain its strength.
Once the welds on the backside are done, allow the plastic to cool completely to room temperature before peeling off the aluminum tape from the frontside. If you used hot staples to fixture the tab, they can be reheated and removed at this point, or you can cut the ends off and leave the staple inside for further reinforcement.
The frontside repair is dictated by whether the tab is visible when the hood is open or not. If the tab is not visible, you have the freedom to weld as needed to restore the structural integrity of the tab. If the tab is visible, you’ll need to cosmetically finish it to its original appearance. If the upper surface of the tab is smooth, this is relatively simple — weld, sand, prime, fill, paint. Just like bodywork on a smaller scale. If the tab has ribs, gussets, or a waffle grid, finishing it out to original appearance is much more difficult. It may make more sense to not weld on the top at all assuming the backside weld has adequate strength. If it’s a self-pay job and the vehicle owner accepts the appearance difference, you can weld the top of the tab to make a very strong repair, especially if you’re able to lay some passes down perpendicular to the crack.
It takes a bit of practice to do a quality nitrogen plastic weld on a headlight tab due to the more complex geometry and thin walls, but the rewards can be substantial thanks to the high replacement cost of today’s headlights. Polyvance offers an online, video-based course, the PR-03, for those who want to get started. If you’re able to repair headlight tabs, you can profit more, turn jobs quicker, and even reduce total losses. No sense feeling nostalgia for the days of the sealed beam — today’s challenges require new tools, techniques, and training.
About the Author

Kurt Lammon
President, Polyvance
Kurt Lammon, president of Polyvance since 1995, has a bachelor's degree in mechanical engineering and a minor in material science. He has been focused on developing and manufacturing products to help auto body technicians and DIY-ers repair damaged plastic parts. Polyvance has specialized in plastic repair products since 1981. The company was founded as Urethane Supply Company by Jim Sparks who invented the original airless plastic welder to repair the thermoset polyurethane bumpers that were popular in the '70s and '80s. Since that time, the company has introduced several innovations, including the Uni-Weld FiberFlex universal welding rod, Bumper & Cladding Coat Adhesion Primer, and the Nitro-Fuzer nitrogen plastic welding system. Polyvance is an I-CAR Sustaining Partner and provides several hands-on and virtual training courses on plastic repair and refinishing.


