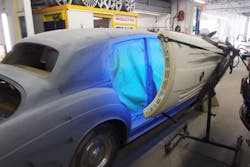
THE INSPIRATION: Greg Coccaro has used UV primers at his shop, North State Custom in White Plains, N.Y., for a number of years and says he was always looking for ways to cut down drying time. Although he had smaller UV curing lamps—two of them, in fact—they could only dry a spot that was a maximum of 12x12 inches.
“When you do them on multiple spots on the car, you have to keep moving it down the car every 15 minutes,” he says. “It takes forever to dry it.”
To fully dry it, he says it took roughly one hour with the normal UV lamp. But, the shop also re-blocks and re-primes everything, meaning the entire process took two hours.
SHOP: North State Custom
LOCATION: White Plains, NY
OWNER: Greg Coccaro
SHOP SIZE: 11,000 square feet
STAFF: 14
AVG. MONTHLY CAR COUNT: 110
ANNUAL REVENUE: $4.2 million
Not only was it a lengthy process, the lamps and the accompanying bulbs were also very expensive. Coccaro says one bulb can cost roughly $800 to replace, on top of the couple thousand dollar lamps.
“I was thinking of ways you could do the entire side of the car in just one shot,” he says.
WHAT IT DOES: That’s when it occurred to Coccaro that a tanning bed might do the trick.
“Knowing that it was also UV, that’s basically how it came about,” he says. “I thought, I wonder if you split a tanning bed in half, if that would actually work.”
The idea, he says, is that each side of the tanning bed could dry the UV primer on an entire side of the car at one time.
At first, he says he wasn’t sure if the wavelength of the bulbs would work. Different UV bulbs have different wavelengths and he wasn’t sure how they would match up. He consulted with his friend and fellow shop owner Ron Reichen, owner of Precision Body & Paint in Oregon, and the two decided to experiment with it.
HOW IT’S MADE: Coccaro purchased a used tanning bed on Craigslist, dewired it and split the two cases in half. He then purchased a couple of pulleys and wire to run through the pulleys to build an apparatus to make the sides of the tanning bed tilt and smoothly move up and down.
Believe it or not, he says that the bulbs from the tanning bed worked perfectly fine and he simply had to plug it in to begin using the machine.
THE COST: Coccaro purchased the tanning bed for $100 and the necessary pulleys and tools to adapt it cost
roughly $300. Altogether, he says it only took four or five hours to build.
THE ROI: The return is two-fold for Coccaro. First, the bed is much less expensive than the lamps. If a bulb on the tanning bed breaks, it only costs $40 a piece to replace. More importantly, the time savings have been incredible, he says. While the old way of using small UV lamps took two hours, he says his staff is able to prime, re-block and re-prime after drying within 30-40 minutes.
“The tanning bed gets pretty much the entire side of the car,” he says. “It’s so much less work.”
