Mastering plastic part refinishing: Best practices for modern vehicles
Key Highlights
- Properly identify whether plastic parts are primed or raw to determine the correct preparation process.
- Use manufacturer-specific procedures, including primer removal and surface scuffing, to ensure optimal paint adhesion.
- Apply anti-static measures and masking techniques meticulously to prevent contamination and overspray during painting.
- Follow ADAS-specific guidelines by controlling coating thickness and avoiding filler or blending over radar zones to preserve system accuracy.
- Always wear appropriate PPE, including gloves, respirators, and safety glasses, to protect technicians from hazardous chemicals involved in plastic refinishing.
No part of the paint tech’s job is easy, but plastic parts can pose special challenges. In recent years, the process of refinishing them has become more nuanced because technicians now work with late-model cars that are equipped with advanced driver-assistance systems (ADAS), but also because of the special characteristics of the surfaces themselves.
Plastic, often seen in bumpers and moldings, requires attention to questions about primer removal, prep scuffing, and the possible presence of mold release agents left over from manufacture. It often calls for the use of special adhesion promoters and sealers in addition to the paint itself and brings managing static electricity into the mix.
What’s key is understanding the proper procedures and best practices for refinishing plastic parts and knowing how to follow them. Some come from paint manufacturers, but many of the rules that ensure quality and safety also come from the automobile manufacturers themselves. In some cases, what’s at stake isn’t only the life of a vehicle, but also the lives of its occupants.
Primed vs. raw parts
One of the first things to confirm is whether a plastic part is primed or raw. If the part is primed, check for the reversibility of the factory primer. To do this, use a solvent-based cleaner on a towel or rag and wipe the primer. The primer is reversible if it’s easily wiped away. Once the primer is confirmed as reversible, check your paint manufacturer’s technical data sheet (TDS) to determine if the proper recommendation is to remove it. If it is removed per the TDS then follow the documented process for treating a raw plastic part. If the primer passes the reversibility test, the primed plastic must be scuffed, sanded, and cleaned before you apply a flexed sealer.
If the plastic part is raw, you will want to assess the part for damage. Pay close attention to the raised plastic seams from the plastic injection process and determine if they need to be trimmed or lightly sanded. Next, check with your paint manufacturer’s TDS to see if it recommends putting the raw bumper through a bake cycle to help sweat out the mold release agents used in the bumper manufacturing process.
Prepping raw plastic
The next step in the process will be determined by the paint company’s TDS. There are normally two different pathways to prep raw plastic: with water-based scuffing paste or with a non-static solvent-based solution.
Generally, the water-based scuffing paste method will call for a wash with a water-based cleaner followed by wetting the surface with fresh water. Any areas of the bumper that need to stay raw plastic must be carefully taped so the next step doesn’t? dull those surfaces. Next, you’ll need to scuff with a wet, ultra-fine scuff pad and the recommended scuffing paste over every spot of the plastic that will be painted. This may take two to three applications. Once fully de-glossed, the surface will require a final rinse with clean water followed by a water-based wax and grease cleaner.
Make sure the scuffing agent is completely removed from tough-to-reach areas to allow the paint to properly adhere. When prepping, try not to let the scuffing paste dry on the plastic, because it can be difficult to remove. Depending on which paint system you're using, the maker may offer a pre-saturated scuffing pad that makes the process very convenient and also streamlines billing.
The solvent-based method starts with a slow-drying, anti-static plastic cleaner you apply to the bumper after masking and then wipe off. Next, some manufacturers recommend that you scuff the panel by running an ultra-fine scuff pad over the plastic areas that need to get painted, followed by a final wipe with the plastic cleaner.
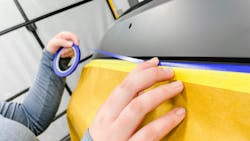
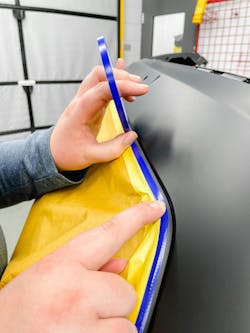
After your bumper is thoroughly dried, you’re ready to tape up any areas that are supposed to remain raw plastic. Start by outlining those areas with 3/4”-masking tape, making sure you leave room for your fine-line tape. Any large areas that are masked off with paper must be anchored down on the backside of the bumper to ensure no overspray gets underneath the masking paper. Once that is completed, do your final precision masking with fine-line tape. If you have to make any especially sharp turns, you can anchor the fine line with another piece of three-quarter-inch tape to keep it from moving when painting.
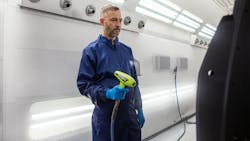
With the bumper in the booth, it's ready for a final tack. Now is the perfect time to use an anti-static gun if you have one at your disposal. If not, there are a variety of anti-static wipes you can use to help keep the static down.
Paint time!
Finally, we get to the fun part: painting! For the sealer to stick to the bumper, you'll first need to put a plastic adhesion promoter down. The adhesion promoter is usually either one thin closed coat or two thin back-to-back coats. This needs to be fully dried before you seal, and an adhesion promoter usually requires a 15-minute flash. Once it’s flashed, you'll need to apply a full coat of flexed sealer.
Don't get skimpy with the sealer on a bumper. Make sure there’s a thickness of one mil when it's dried, which provides proper adhesion and some cushion for rock chips. Next, apply the base coat, assuming you have already verified the color. Then, finish it off with a couple of coats of flexed clear. Again, don't skimp on the clear! There should be a minimum of two mils to avoid rock chips and paint delamination. Peel off the fine line tape and hit bake.
ADAS considerations
Working on a newer car with ADAS calls for a different process. ADAS relies on radars to sense and measure collision threats, and with some ADAS systems, the radar goes through the painted part of the bumpers. If you’re working on one of those vehicles, your process affects safety as well as aesthetics—and there are quite a few things to keep in mind.
In this case, both your paint company and the manufacturer of the vehicle will have recommendations you need to follow. The thickness of the bumper itself must be taken into consideration, and so must the thickness of the paint as well as its aluminum content. The manufacturer recommendations are specific to each vehicle, and you should prioritize those first.
In general, the areas of the bumper that the radar passes through cannot be repaired with filler, because that will create an improper and non-uniform thickness on the bumper. Because mil thickness consistency, especially with metallics, is essential to ADAS function, blending base coat over the radar area of the bumper is also not allowed; that can cause inconsistent radar readings. Overall, you should keep the mil thickness of all coatings as low as possible to make sure the cumulative mil thickness is below the vehicle manufacturer’s threshold for paint material over the radar zone.
Pigment and pearl in the base coat are usually not as critical as the aluminum content, and the paint manufacturer will have specific formulas designed with lower metallic content to make sure they won't interfere with radar transmission. Painting a bumper for a car with ADAS requires the use of one of these approved formulas. That also means they should not be tinted, because that may change how the radar is transmitted through the base coat. If the best radar-approved color isn't an acceptable color match to spray only the bumper, you may need to blend additional panels for an invisible repair—because safety comes first.
It is important for the writer in the front office to verify whether a car has ADAS when it comes in for a bumper repair. That way, the writer can notify the paint department, and the painter can have radar-approved formulas sprayed out for the vehicle before the bumper is in the booth. Doing this lets the painter determine whether additional blending is needed due to color match. Don't wait until the bumper is in the booth to make that call.
All in all, ADAS requires a few extra steps to ensure a safe and proper repair. First, get a copy of the repair procedure from the vehicle manufacturer. If necessary, get a whole new OEM bumper. Unnecessary coating thickness matters on the back of the bumper too, so before painting, you’ll need to mask off the back to shield it from overspray. Always use the proper undercoat shade when sealing and use the least amount possible of the radar-approved base coat color. Blend adjacent panels if necessary. Then finish the job with a flexed clear.
Safety first
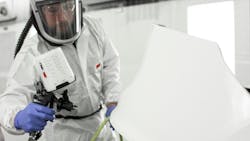
The proper function of ADAS is important for occupant safety, but let’s not forget the technician—his or her safety is a top priority too. In the shop, technicians work with hazardous chemicals that can be easily absorbed into the body. Wearing the proper personal protective equipment is essential for worker safety. Nitrile gloves, respiratory protection (such as a respirator, fresh air system or PAPR), safety glasses, and a paint suit should be worn at all times when completing these repairs. Because the substances that go into plastic surface refinishing aren’t always the same as with metal or fiberglass parts, it’s important to understand each product’s safety specs from the manufacturer’s technical data sheet (TDS) before starting.
If you follow the guidelines set by the paint manufacturers and the OEM repair procedures, you can make your workflow more efficient, avoid inefficiencies in quoting and billing, and turn out a quality repair each time — not only one that’s attractive and durable, but also one that will keep your customers happy and safe for years to come.
About the Author

Michael Nelson
Refinish Trainer
Michael Nelson is a refinish trainer at the 3M Skills Development Center. Michael has served the collision industry for 29 years. He previously held production painter and product specialist roles for Finishmaster and Axalta Coating Systems. He trains painters and preppers from across the country on all aspects of the collision repair process.