From the bay to the binder: A technician’s guide to identifying and documenting ADAS calibrations

Why Process Matters
The vehicles rolling off the assembly line today are absolute marvels of engineering…and headaches of complexity.
With each model year, the number and variety of advanced driver assistance systems (ADAS) grows, and so too does the challenge of servicing them correctly.
Servicing these systems can’t come down to guesswork, luck, or shortcuts. Shops that want to put safe cars back on the road should have a repeatable process that ensures each calibration is done at the right time, in the right way, every time .
No, it’s not glamorous work. There are no TV cameras or flashy reveal moments when you nail a calibration. But this process is central to returning a vehicle to its operational baseline. The customer may never understand every step you took. But their safety — and the shop’s liability — depend on it.
This article will cover a method to create a consistent, disciplined process that will lead to an outcome of proper identification and documentation of ADAS requirements and calibrations.
Initial Identification: Setting the Foundation
The path to a successful calibration starts way before a wrench turns or a panel is removed. The initial identification stage ensures you know exactly what ADAS systems are in the vehicle and what might be affected by the repairs.
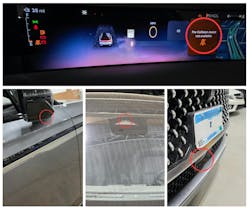
360° Vehicle Walkaround
At vehicle intake, an estimator, service advisor, or technician should conduct a full walkaround.
- Look for visible ADAS components such as forward-facing cameras, radar sensors, ultrasonic sensors, Lidar units, and surround-view cameras.
- Note their condition — any misalignment, cracks, or damage could influence calibration or require replacement.
- Check for mounting points that look disturbed or modified.
Review Build Data
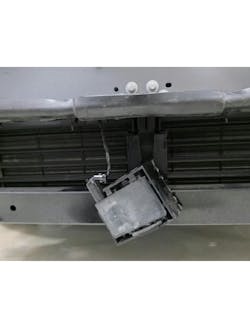
Not every ADAS system is obvious. Some are tucked away behind grilles, embedded in bumpers, or mounted high on windshields.
- When possible, pull the vehicle OEM-build data to identify every system installed from the factory (some manufacturers are better than others in the difficulty of obtaining this information).
- This step often uncovers “hidden” systems that even experienced technicians might overlook.
Perform a Diagnostic Scan
A pre-repair scan is your early warning system.
- It detects modules and features that aren’t visually obvious.
- It identifies trouble codes that could interfere with calibration success.
- It establishes a digital baseline for system health before repairs begin.
Identify Modifications or Aftermarket Equipment
Aftermarket parts, accessories, or modifications can be calibration-killers.
- Lift kits can change radar aim.
- Tinted windshields can affect camera vision.
- Non-OEM bumpers can alter sensor placement.
If OEM conditions can be restored, work with the owner to do so. If not, declining the repair is the safest choice.
The Blueprint Phase: Building the Plan
For collision shops, the blueprint phase is the launch point for building the repair plan and identifying ADAS calibration needs. For mechanical shops, the process is similar — the difference is often in scope.
Collision repairers focus on damaged panels and structural parts, while mechanical repairers have to be aware that performing “routine” services like alignments or suspension replacements are likely calibration triggers.
Document Calibration Requirements Early
- Reference OEM repair procedures to identify when calibrations are required.
- This could include replacing glass, removing bumpers, performing suspension work, or even disconnecting certain wiring harnesses.
- Record this in the repair plan so no steps are missed later.
Validate Technology Output
Software solutions can speed up the process, but they’re not perfect.
- Always verify what the software flags.
- A technician’s knowledge is still essential for catching edge cases.
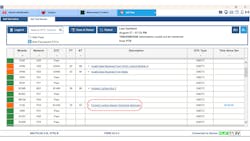
Photo-Document Systems
Photos aren’t just for show; they’re your proof.
- Document the exact sensors and cameras present.
- Record their condition before repair.
- If a dispute arises later, these images can save hours of argument.
Perform Pre- and Post-Disassembly Scans
- Perform the pre-disassembly scan if one has yet to be done, as this serves as your baseline.
- The post-disassembly scan records changes, flags new trouble codes, and can be compared against the pre-scan for anomalies or for future diagnostic needs.
Example Scenario
A technician who’s done thousands of alignments has no problems knowing what to adjust for the perfect alignment. But without checking OEM procedures, they could miss that a forward-facing radar and camera require calibration after performing adjustments.
Calibration Phase: Confirming the Requirements
Once repairs are complete, the vehicle enters the calibration phase. Here, early planning pays off and at a minimum reduces but should eliminate missed calibrations.
Reconfirm Calibration Needs
- Match current calibration requirements against what was identified at intake.
- Add any new calibrations caused by changes during the repair.
Facilitating Information Flow
- In-House Calibration Facility: Provide calibration technicians either with direct access to or a printed copy of the repair estimate so they can audit the file.
-
Contracted Calibration Facility: Supply a detailed work record. Another option is to provide a data connection via scrubbing software to pull data from estimates automatically.
Pre-Calibration Prerequisites
Before calibration, you must meet every prerequisite outlined in OEM service information, e.g.:
- Remove excess weight from the vehicle.
- Adjust tire pressures to specification.
- Fill the fuel tank as required.
- Verify alignment specifications are correct.
Document these steps with photos, reports, or both.
Second 360° Inspection
This is your chance to catch problems before they cost you.
- Verify there are no new modifications or damage.
- Inspect repairs for proper fit, finish, and color match.
- Ensure hoses, wiring, and fasteners are secure.
Pre-Calibration Scan
- Verify system health and readiness.
- Document any module programming or configuration steps.
- Log ancillary tasks like battery support, as these can be reimbursable.
If an issue is identified at this point, it needs to be addressed prior to calibration. Waiting until after could require recalibration and a direct hit to profit and efficiency.
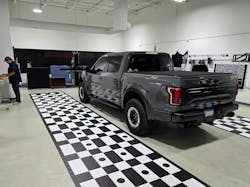
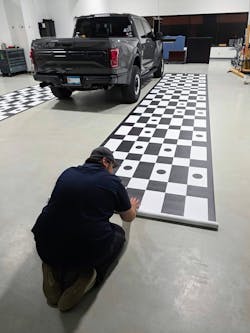
Calibration Execution
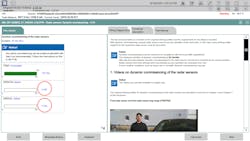
Calibration comes in two main types: static (targets, fixtures, and measurements in a controlled space) and dynamic (performed while driving, often with a scan tool connected). Some systems require both.
Calibration
- Follow service information specs to the letter, a few millimeters off can cause at best an inaccurate calibration or a failed calibration all together.
- Capture pre-calibration sensor data, if available.
- Document target placement measurements using tape measures, digital tools, or target stands with integrated logging.
- Log as much data as possible during the calibration procedure.
Record both successful and failed attempts, as failed calibrations can be as important as successes when troubleshooting.
Post-Calibration Documentation
When the calibration is complete, the work isn’t done until it’s documented.
-
Capture Post-Calibration Sensor Data
- Sometimes generated automatically; other times you’ll need to pull it manually from the data stream.
-
Perform Dynamic System Verification (DSV)
- Test all ADAS systems, not just those you calibrated.
- Document the route, driving conditions, and any anomalies.
-
Compile the Record
- All diagnostic repair scans.
- Pre- and post-calibration sensor data.
- Photos and measurement documentation.
- DSV results.
- Equipment details used during calibration.
Why Documentation Pays Off
Thorough documentation is more than an administrative step; it can be a competitive advantage that separates professional operations from those cutting corners.
The gap between a well-documented calibration and one that exists only in a technician’s memory can determine the outcome of insurance disputes, customer relationships, and legal challenges.
This emphasizes a final point: precision matters and liability runs high. If it’s not documented, it didn’t happen.
Closing the Loop
The ADAS calibration process is not just about “checking the box” for OEM procedures. It’s about creating a traceable, auditable, defensible record of work from the first intake photo to the final signed-off file.
From the bay to the binder, every step should be methodical, consistent, and documented. That’s how you protect the shop, protect the technician, and most importantly, protect the customer.
About the Author

Paul Bostel
Director of Advanced Vehicle Technology
Paul Bostel is a seasoned leader with a rare blend of expertise in both advanced automotive technology and fire service operations. With over 20 years in the automotive industry, he is recognized as one of fewer than 2,300 ASE World Class-certified technicians — a distinction that underscores his mastery in diagnosing and repairing complex vehicle systems, with a specialized focus on ADAS. Paul is director of Advanced Vehicle Technology for Quality Collision Group, where he applies his analytical precision and strategic mindset to elevate operational performance and repair standards.
In parallel with his automotive career, Paul has proudly served the Apple Valley Fire Department for over nine years and holds the rank of captain, demonstrating his strong leadership, commitment to community service, and ability to manage high-pressure environments. His career is defined by innovation, efficiency, and a continuous drive to raise industry standards across every role he takes on.