Essential Do's and Don'ts for Successful Plastic Bumper Repairs
Before any discussion around plastic bumper repair, it must be mentioned that it’s necessary to refer to the OEM service information to determine if it is recommended to do any repairs at all, if you can only repair in specific areas, or if you can add to the paint coating’s thickness when refinishing. Some of these cautions related to ADAS sensor functions are safety requirements that must be strictly followed. There are many other vehicle specific recommendations that you will need to identify before you begin repairs.
The adhesive products used for plastic repair have never been more user-friendly and have helped to make repairs very simple and reliable. However, the key to successful plastic repair is using the specified adhesives in the exact manner for which they were designed. This is one segment of the repair where following the product maker’s instructions to the letter is directly linked to success. This is no place for replacing the product manufacturers’ information with tribal knowledge, YouTube hacks or bench-top chemistry. One of the main reasons technicians are reluctant to repair plastics is that they may have had a bad experience or failure in the past because they potentially strayed from the official instructions. The drawback to typical instructions or SOPs is that they only instruct technicians what to do, but it may be just as important to tell technicians what not to do. Below is a list of the most common plastic repair errors that technicians make, and avoiding these errors will vastly improve their chances for success.
Always follow the manufacturer’s instructions, but if you’re still having failures, these in-depth “do’s and don’ts” should be helpful. These tips align with the 3M Two-Sided Repair SOP (see link for downloadable PDF at the bottom of this article), but they also pertain to the other plastic repair SOPs’ similar steps.
Pre-cleaning
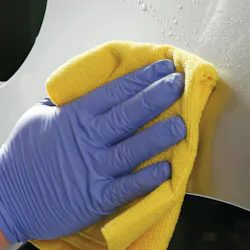
Do: Clean the entire bumper or part, not just the damaged area.
Why? Cleaning the entire bumper will prevent remaining contaminants from being dragged into the clean repair area. More importantly, by cleaning the entire bumper, you may be able to identify additional damage that may not be visible while dirty. Damage like spider cracks, broken or missing tabs, stone chips or paint defects may be exposed after complete cleaning. Discovering unrepairable hidden damage after repairs are made can lead to wasted time on an unrepairable bumper.
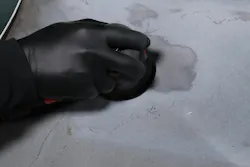
Do Not: Soak the plastic with liquid cleaners after removing the paint coatings.
Why? Using liquid cleaners after the repair area has been sanded to raw plastic creates an unnecessary risk of failure. Solvents can wick into the surface of the raw plastic and may take some time to escape. If adhesives are applied before the solvents can escape, it may cause adhesion failure. It’s best to use clean compressed air only to clean bare plastic areas.
Do: Clean with both soap and water and a VOC- compliant wax and grease remover or plastic cleaner.
Do: Thoroughly clean the back of the bumper.
Why? The OEM bumper suppliers coat the injection molds with a non-stick substance to prevent the bumper from sticking to the mold. They typically do not clean the unfinished back of the bumper before shipping.
Prepare for Reinforcement Material
Do: Ensure that the crack or damage is perfectly aligned. An uneven surface will continue to pop up as you shape-sand the cosmetic filler - making it difficult to make a smooth, even repair.
Do not: Taper the backside of the bumper. To prepare for back side reinforcement, it is only necessary to sand to rough up the surface thoroughly to create a fuzzy texture to create better adhesion.
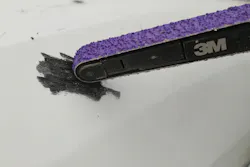
Do not: Use a grinder with an aggressive grade grinding disc in place of a DA sander. A grinder is too aggressive and creates smooth melted scratches that do not bond to the adhesive well. Deeper scratches don’t achieve a better bond. Only grade 80 on a DA sander will create the fuzzy surface texture necessary to achieve a strong adhesive bond.
Do not: Use a liquid cleaner on the sanded surface, only clean, dry compressed air.
Do not: Soak the plastic with the adhesion promoter. A medium wet coat is best.
Do not: Rush the flash time for the adhesion promoter, especially in a shop colder than 70 degrees F.
Do: use the adhesion promoter correctly and read the instructions. It’s critical to follow coat thickness and flash time guidelines to avoid failures. Adhesion promoter contains a chemical that etches or bites into the plastic surface. This creates a chemical bond to the plastic. When adhesive is applied, it will bond onto this etched surface, creating a strong mechanical bond. With both a chemical and mechanical bond, the chances for good adhesion vastly increase. If you are having problems getting a fine featheredge, you may have applied the adhesion promoter too heavily or may not have allowed enough time for it to flash off.
Do not: Mix product systems. Only use the adhesion promoter specifically recommended for that adhesive. Other adhesion promoters may work, but you are unnecessarily introducing another variable for failure.
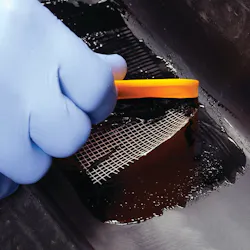
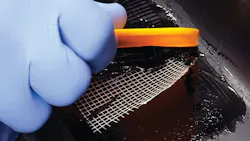
Apply Reinforcing Material
Do not: Apply the reinforcing patch directly to the plastic. Apply it to the wet-bed of adhesive.
Why: The cloth reinforcing patch doesn’t bond well to the plastic and decreases the surface area of the adhesive bonding surface.
Do: Immediately after you tamp the cloth into the wet adhesive, apply another layer of adhesive over the reinforcing patch. Work quickly, as the adhesive starts to cure quickly. Add more layers to achieve the desired thickness and strength. One or two layers are typically sufficient.
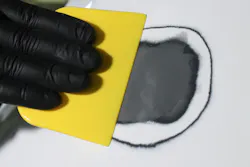
Tapering the Front Side
Do not: make a narrow “V groove” taper. The taper must be approximately 3” wide and have gradual sloped edges. Sharp edges will cause the repair to map or ghost over time.
Do not: Grind or sand plastic bumpers at high speeds, which will melt or smear the soft plastic. Adhesives will not adhere to melted or smeared plastic and once the plastic is melted it will be difficult to correct the melted areas. Any melted or smeared plastic areas must be removed by sanding at slower speeds.
Do: Taper deep enough to begin to expose the adhesive from the back of the bumper. This will allow the adhesive from the back side to bond to the adhesive on the front side and ensure the damage is repaired all the way through the thickness of the plastic.
Preparing Repair Area
Do: Make sure the sanded repair area has no grinder scratches or gouges. The surface must have a perfectly uniform, fuzzy texture.
Why: This is a critical step because repair adhesives will not bond to shiny, smooth plastic. These areas may bubble up later, most likely during the bake cycle or in the sun. Meticulously sand low, shiny areas which will be identified by blowing off the repair area.
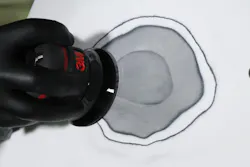
Do: Follow instructions for sanding the area surrounding the dished-out area. Take care not to stray into the dished area where grade 80 is necessary.
Do not: Apply the cosmetic repair adhesive over the paint. To avoid this, be sure to sand the surrounding area large enough so that your adhesive application does not extend to the painted surface. Give yourself plenty of room, as feathering a larger area only takes a minute or so and will ensure that the adhesive feather edge winds up on the plastic where it belongs and not on the paint where it’s likely to peel. Removing the paint with grade 180 about 3” to 4” all the way around the tapered area is usually sufficient depending on the size of the damage.
Do not: Sand with a grade 180 disc in the tapered area that you have previously sanded with grade 80.
Mix and Apply Flexible Filler
Do: Be sure to equalize the adhesive cartridge and purge some adhesive from the mix nozzle before applying adhesive to the damaged area.
Do: Apply the adhesive to the bumper while keeping the mix nozzle tip submerged in the adhesive. This will avoid pin holes in the cured adhesive.
Do not: Apply the adhesive in a zig zag pattern or drizzle it onto the surface. This will entrap air and create pinholes.
Do: Apply enough adhesive to the damaged area allowing for some slight flowing of the adhesive as it sets up. Cupping the spreader slightly on the last wipe will leave more adhesive in the lowest area of the damage. Taking care to apply the adhesive neatly at this stage will make sanding easier. Clean up the edges with your spreader.
Do not: Rush the sand time especially if the shop temperature is colder than 70 degrees F. A few extra minutes or some gentle heat from a heat gun or lamp will ensure the edges feather well.
Sand Flexible Filler
Do not: Sand at high speeds. Turn the DA down to an appropriate low speed and sand carefully. Sanding at high speeds will create heat and soften the adhesive, especially where it is very thin at the outer feather edge areas.
Do not: Bear down with heavy pressure on the sander or sand continuously in one spot. Keep the sander moving with moderate to light pressure. Let the sander action do the work. Too much pressure can create heat that can make it difficult to get a fine feather edge. If you’re having difficulties creating a fine featheredge, you are most likely creating heat with your sanding technique, or the adhesive isn’t fully cured for sanding.
Do not: Leave any stray grade 80 scratches in the adhesive or surrounding area. Be sure to thoroughly refine these scratches with at least grade 180, or they will be visible after refinishing.
Final Sand and Inspect
Do: Use a block to do the final sanding to ensure the repair is straight.
Do: Carefully inspect for scratches or pinholes.
Do not: Fill pinholes with body filler or glaze. These products will fail to bond with the adhesive filler and bubble up later in the repair process or bake cycle.
Do: Only use the same cosmetic flexible filler that you made the repair with. Use the corner of a filler spreader to force the filler into the pinholes. Sand after curing.
Do not: Use the aerosol adhesion promoter that was used for the adhesive to coat the final repair. At this stage of the repair, always use the adhesion promoter recommended by the paint company prior to refinishing plastics.
Conclusion
Carefully following these tips and the product makers’ instructions will help eliminate possible repair failures. Taking a few extra minutes to be meticulous and thoroughly following the steps outlined will go a long way toward a quality repair.
Download a Printable 3M Two-Sided Bumper Repair SOP PDF Here:
About the Author

Shawn Collins
Shawn Collins recently retired from 3M as advanced application engineer. He was an ASE Certified collision technician for 26 years and has been an I-CAR instructor for 19 years. He teaches more than 50 different training programs and is both a steel and aluminum welding qualification test administrator for collision repair shops and insurance companies.