Why glue pulling doesn't work for you (and how to fix it)
Whether you are a technician, a manager, or a shop owner, if you haven’t made glue pull repair part of your repair process, you are missing out on a less invasive, more efficient, safer, and cleaner way to repair vehicles. The advancements that have been made in glue pulling continue to expand what is possible with this method — from improvements in glue tab technology that help move metal cleaner and attach to more areas, to new tab and lifting device designs that allow technicians to work on aluminum and high-strength steel.
Not to mention, when metal is moved today using proper lateral tension, repairs that were impossible just a couple of years ago are now achievable with ease. Time and time again, I hear from technicians who can now work metal to a cleaner level, shrink their overall repair area, and — most exciting of all — enjoy their jobs more. The learning curve for glue pulling is actually very short, and with one system you can now work on steel, aluminum, and high-strength steel.
I’ve been teaching glue pulling to body technicians all over the world since 2019, both as a master trainer for KECO Body Repair Products and independently through my own company. The number one question I get when I share some of my glue pull repairs is, “What glue is that?”
I must tell you — that’s my least favorite question about glue pulling. Not because the glue doesn’t matter, but because the glue itself is only one small part of the equation for successful repairs. The biggest problem I hear when I walk into a shop is, “I just can’t get it to stick!”
Just like in the body repair and refinishing world, there is a process that needs to be followed. You would never eyeball a paint mix. If you don’t follow the process for mixing and applying filler, you will end up with failures.
Think about all the steps involved in any stage of auto body repair.
When you know and follow the process for glue pulling, it becomes a simple, repeatable system. It is also easy to self-diagnose if you end up having a bad pull — just go back and see which step you missed.
As far as the process goes, I have seen several approaches from different glue pull companies. Some promote ten-step processes that, in my opinion, are overly complicated. CamAuto Pro has a five-step process they share on their glue bags. Then there is the KECO 6C Process, which actually encompasses the entire CamAuto process within it.
In all my years of teaching, I have not found a way to shorten or improve upon the 6C Process.
I’m going to share this process with you in my own words, the same way I would teach it if I came into your shop. I promise that if you follow these steps, you’ll get strong, repeatable pulls every single time and be well on your way to becoming an expert in glue pull repair.
The six steps in the 6c process are: Check, Choose, Clean, Coat, Correct, and Continue.
#1: CHECK
Check OEM procedures. Make sure you’re performing repairs that are appropriate.
Check your substrate — what metal are you working on? In sheet metal repair, we typically deal with three types of metal: mild steel, aluminum, and high-strength steel.
Mild steel is the easiest to work on, though unfortunately there is less of it used on vehicles today.
Aluminum is also becoming more common, and we all know it is a more stubborn and difficult metal to work with.
Last — and my least favorite — is high-strength steel (HSS). HSS can range from relatively easy to work, much like mild steel (low MPa), to incredibly difficult (high MPa).
Consult OEM repair information to determine rigidity. Knowing your metal will help you decide how aggressive you need to be.

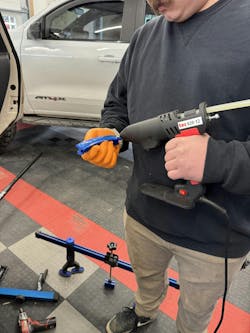
Next, check temperatures. I recommend using an infrared thermometer — or, if you really want to nerd out, an infrared camera. First, use a glue gun capable of reaching 190–200°C (360–390°F). This is required to properly activate collision glue and apply glue to larger collision tabs.
Next, check the ambient temperature of the panel you’ll be working on. Knowing this helps you monitor panel temperature and stay within the ideal glue pull range of 75 –90°F.
#2: CHOOSE
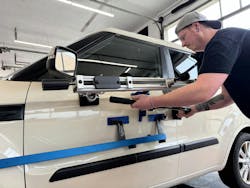
Choose where to start pulling. When working on sheet metal, I like to follow this repair path: strongest to weakest, deepest to shallowest.
With glue pull repairs, the strongest areas you’ll encounter are what I call light structure — quarter panel wheel wells where multiple layers of metal come together, dog legs, and door jambs. Addressing these areas first helps relieve stress on the outer sheet metal.
Next are body lines and hard contour lines. Address these before moving on to the remaining lows, working from deepest to shallowest once strength has returned to the panel.
Choose your glue. In a collision repair environment, you will almost always use a dedicated collision glue such as KECO Collision Glue, CamAuto Collision, Anson Hard Pull, or Perfect Pull. Collision glues are specially formulated hot-melt glues designed to withstand extreme pulling force while remaining flexible enough to conform to the panel as the dent moves. They also absorb vibration under tension, while allowing you to strike the panel to knock down crowns and high spots.
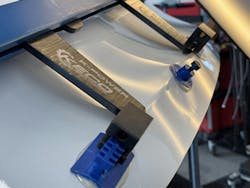
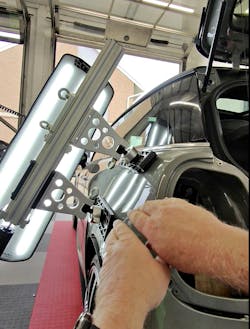
Pick your tab. Choose a tab shaped like the low you’re trying to lift or the body line you’re trying to raise. The most important rule: the tab must fit inside the shoulders of the dent, never overlap them.
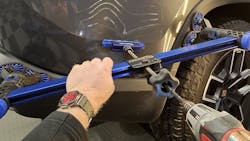
Choose your lifting device. From beams and leverage bars, to pull towers and frame machines, or even simple slide hammers, there are usually multiple options that make sense. If the tool has feet, make sure those feet are on the crown of the dent or beyond. Never place feet inside the low.

#3: CLEAN
Clean the panel and tab thoroughly. Wipe with 99% isopropyl alcohol (IPA). You can find 99% IPA through glue pull repair companies, local paint suppliers, or online retailers. In a pinch, 91% IPA from a pharmacy will work, but 99% cleans better and releases glue faster.
If you have transfer marks or the vehicle looks like it just came out of a detail shop, polish the panel with a quality compound and follow up with 99% isopropyl alcohol.
Never use petroleum-based solvents on tabs.
#4: COAT
Heat the area of the panel you’re pulling to 120°F to remove moisture. Warm tabs to approximately 100°F.
Apply glue generously, edge to edge. If you’re unsure how much glue to use, use a little extra. More glue will never hurt your pull — it may only slightly increase dry time.
Set the tab carefully on the panel and allow it to cool. Do not smash all the glue out, but also don’t just lightly set it on the panel. Instead, place the tab into a proper bed of glue. Think of a mason setting a block into a bed of mortar.
Do not pull until the tab cools below 90°F.
#5: CORRECT
Now it’s time to start moving metal.
Pull when the tab cools below 90°F, but do not let it drop below 75°F. Too hot, and the glue will be soft and gummy; too cold and the glue becomes brittle and prone to cracking.
Tech Tip: When using an infrared thermometer, place the tip close to the tab. Holding it too far back gives an average temperature, but you need to know the exact temperature under the tab. This is where an infrared camera really shines.
Do not just rip the tab off the panel.
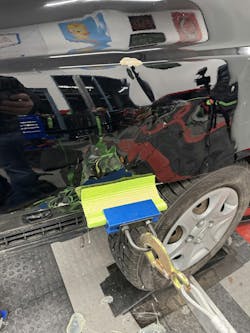
Begin pulling the lows. As long as the low is moving, continue applying pressure. When you feel or see resistance, begin knocking down crowns or high spots. Alternate between pulling and knocking down until you’ve maximized the movement.
Release tabs using 99% isopropyl alcohol. Clean the panel and reassess the damage.
#6: CONTINUE
After releasing the tabs, wipe the panel and reassess the repair. If more pulling is needed, loop back to the beginning of the 6C Process and repeat.
Each round of pulling simply keeps you cycling through the 6C Process until you’re ready to move on to the next phase of the repair.
In all my years of teaching glue pull repair and handling technical support requests, I have yet to encounter a “glue pull doesn’t work” problem that couldn’t be solved by following this process.
Taking the time to properly learn glue pull repair will absolutely change how you repair vehicles. It’s incredibly rewarding to hear from technicians who say this approach has made their work cleaner, more efficient, and more enjoyable. I hope this article helps you experience the same. Happy pulling!
About the Author

Gene Fetty
President
Gene Fetty is the president of Dent Repair Now and a nationally recognized technician, educator, and content creator in the paintless dent repair industry. With more than two decades of hands-on experience, Gene has trained thousands of technicians across the U.S., spoken at major industry events, and served in leadership and advisory roles within the PDR community. His work focuses on advanced repair techniques, business strategy, and modern marketing for service-based automotive businesses.
Gene also hosts The All Access Podcast, where he shares real-world insights on PDR, glue pull repair, training, and the realities of building and scaling a service business. To read Gene’s latest articles, podcast episodes, and training resources, click HERE.